使用assimp库进行模型文件的加载与操作
环境说明
- 开发环境: Linux
- 库: assimp, glew, glfw, glut
- 运行环境: Linux
编译指令
1
g++ -o loadModel loadModel.cpp -lGL -lGLU -lglut -lglfw3 -lX11 -lXrandr -lXinerama -lXi -lXxf86vm -lXcursor -lpthread -lGLEW -ldl -lassimp
文件说明
1
2
3
4
5
6
7
8
.
├── bunny.ply #兔子模型
├── cow.obj #奶牛模型
├── loadModel #可执行文件
├── loadModel.cpp #主程序
├── Mesh.hpp #Mesh库
├── Model.hpp #Model库
└── readme.md
功能说明
可加载常用的模型文件(obj, ply …),并能进行平移、缩放与旋转,支持三种查看模式——wire、flat、flat lines
运行方法
将可执行文件与待加载的模型文件(obj、ply等)放在同一目录下,linux命令行下运行:1
./loadModel name
其中name为模型文件完整文件名
操作说明
- 空格:切换查看模式
wire,flat,flat lines - 鼠标滚轮:缩放模型
- 鼠标拖拽:移动模型
- 方向键:旋转模型
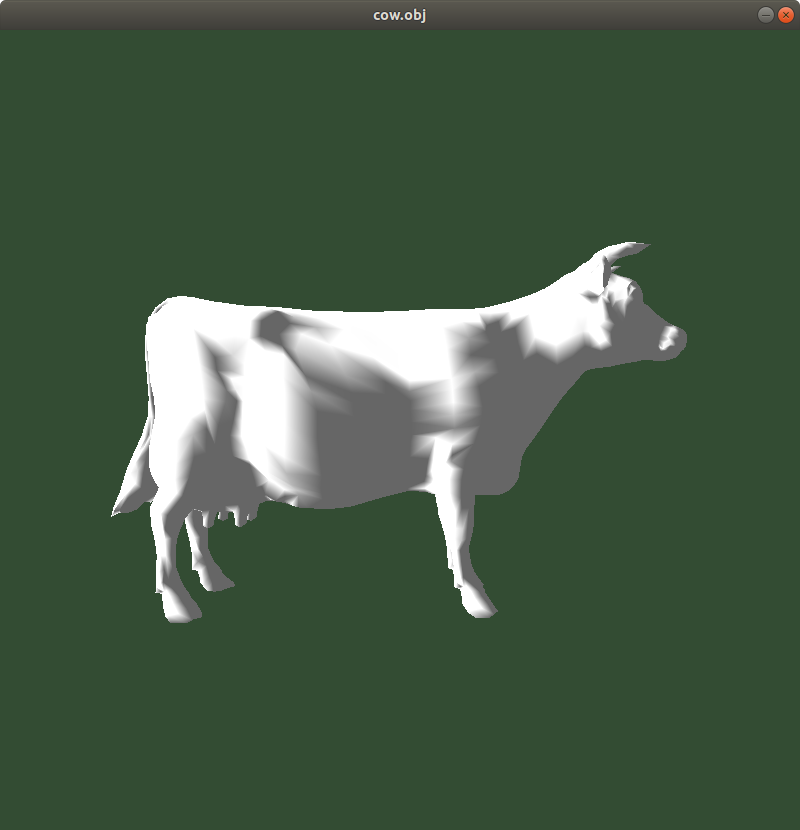
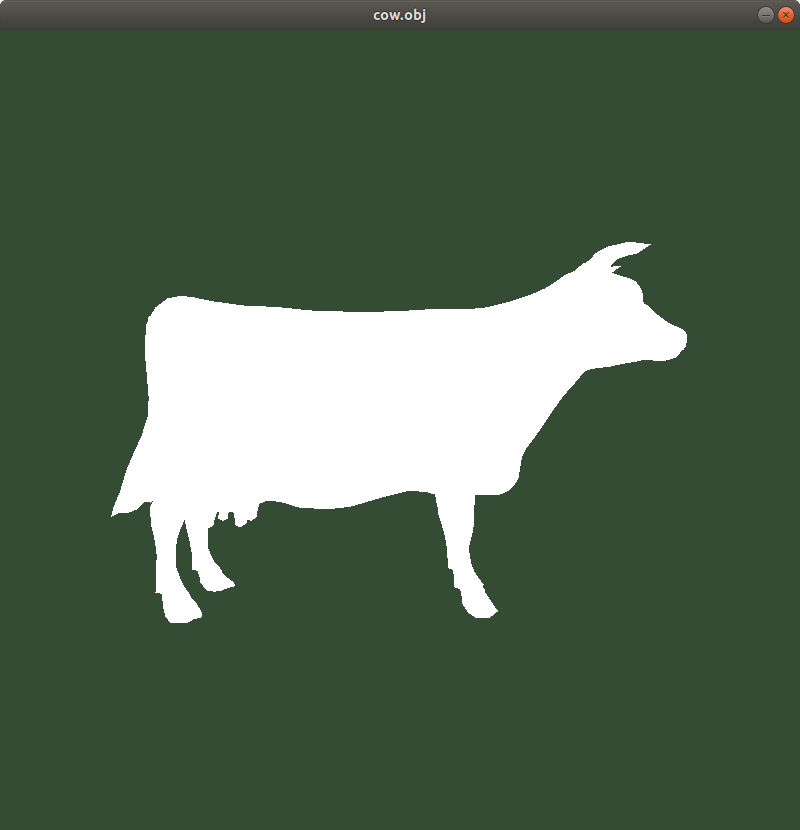
运行效果
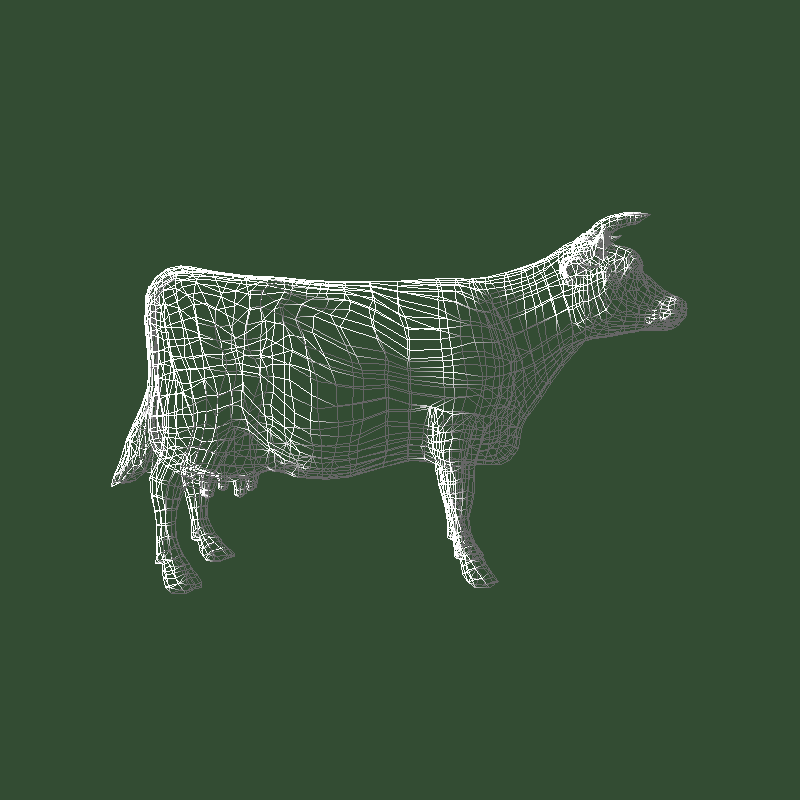
旋转
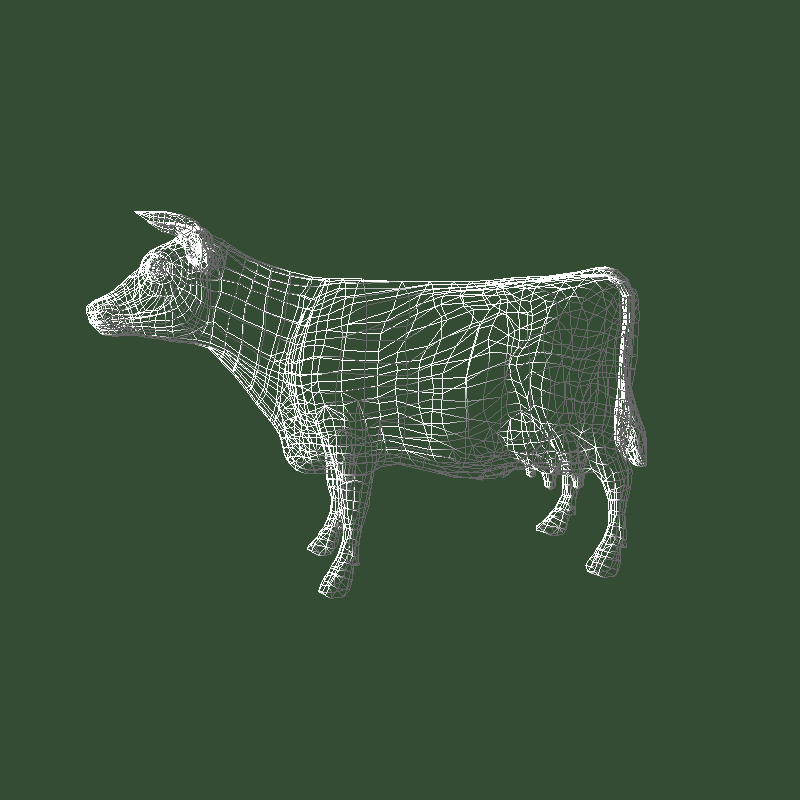
切换显示模式
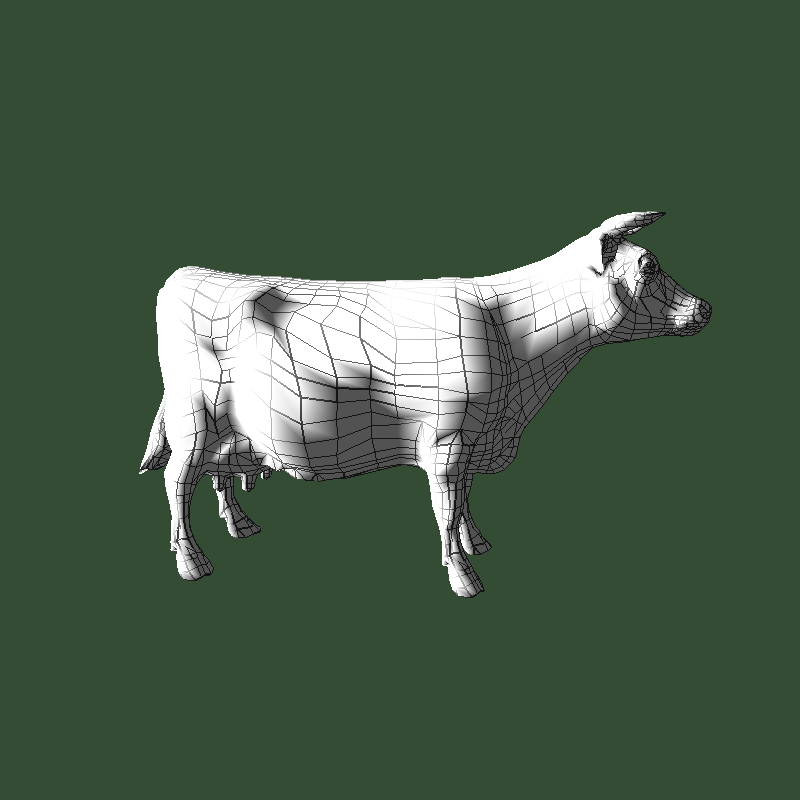
平移
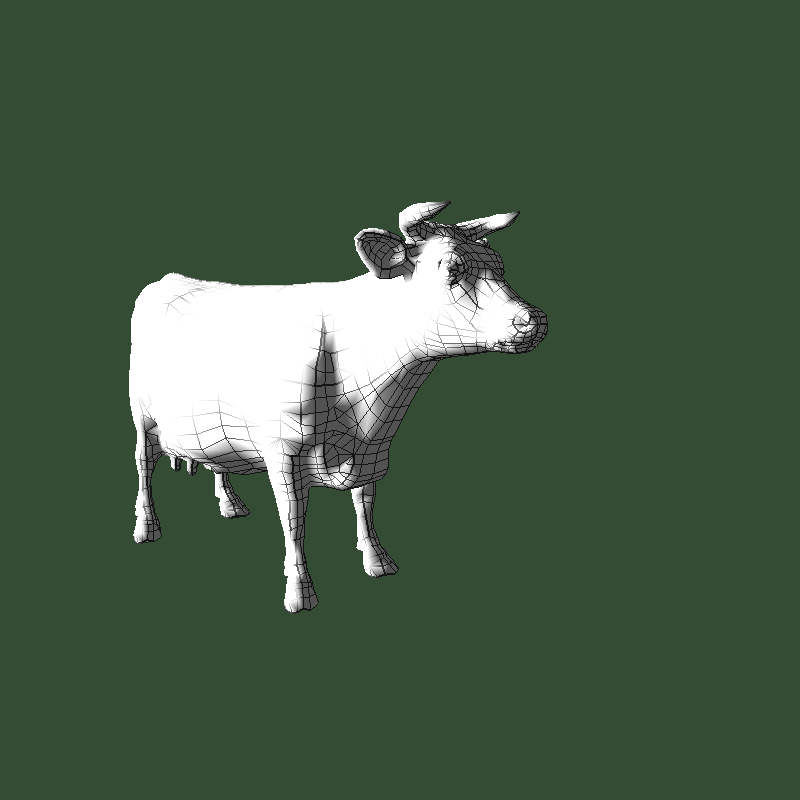
缩放
加载ply格式的bunny
实现思路
安装与连接assimp
Ubuntu下安装assimp库:1
2sudo apt-get install libassimp-dev
sudo apt-get install assimp-utils
编译链接1
g++ ... -lassimp
模型类
模型类的思路参考learningopengl,但去掉了纹理相关(还未开始学习),以及将绘制相关的绑定缓冲区、自定义着色器改为glut实现。
数据结构:
1
2
3
4
5
6
7
8
9
10
11
12
13
14
15//模型类——包含meshes
class Model
vector<Mesh> meshes;
//Mesh类——包含顶点及面索引
class Mesh
vector<Vertex> vertices;
vector<GLuint> indices;
//顶点,包含坐标及法向量
struct Vertex
{
vector<GLfloat> pos;
vector<GLfloat> nor;
};加载:
读入一个模型文件
1
2
3
4
5
6
7
8
9
10
11
12
13
14
15
16
17
18void loadModel(string path)
{
Assimp::Importer importer;
const aiScene* scene = importer.ReadFile(path, aiProcess_Triangulate | aiProcess_GenSmoothNormals);
//模型文件path为路径
//aiProcess_Triangulate 使文件以三角形作为图元生成
//aiProcess_GenSmoothNormals 为没有法向量的顶点设置法向量
//加载错误,反馈信息
if(!scene || scene->mFlags == AI_SCENE_FLAGS_INCOMPLETE || !scene->mRootNode) // if is Not Zero
{
cout << "ERROR::ASSIMP:: " << importer.GetErrorString() << endl;
return;
}
//进行递归遍历节点
this->processNode(scene->mRootNode, scene);
}通过递归遍历模型的节点及mesh:
1
2
3
4
5
6
7
8
9
10
11
12
13
14
15
16
17void processNode(aiNode* node, const aiScene* scene)
{
// 便利节点上的每个mesh
for(GLuint i = 0; i < node->mNumMeshes; i++)
{
//加载mesh
aiMesh* mesh = scene->mMeshes[node->mMeshes[i]];
this->meshes.push_back(this->processMesh(mesh, scene));
}
//遍历子节点
for(GLuint i = 0; i < node->mNumChildren; i++)
{
this->processNode(node->mChildren[i], scene);
}
}读取mesh的每个顶点:
1
2
3
4
5
6
7
8
9
10
11
12
13
14
15
16
17
18
19
20
21
22
23
24
25
26
27
28
29
30
31
32
33
34
Mesh processMesh(aiMesh* mesh, const aiScene* scene)
{
// Data to fill
vector<Vertex> vertices;
vector<GLuint> indices;
// Walk through each of the mesh's vertices
for(GLuint i = 0; i < mesh->mNumVertices; i++)
{
vector<GLfloat> vertex(3);
vertex[0] = mesh->mVertices[i].x;
vertex[1] = mesh->mVertices[i].y;
vertex[2] = mesh->mVertices[i].z;
Vertex tmp;
tmp.pos = vertex;
vertex[0] = mesh->mNormals[i].x;
vertex[1] = mesh->mNormals[i].y;
vertex[2] = mesh->mNormals[i].z;
tmp.nor = vertex;
vertices.push_back(tmp);
}
// Now wak through each of the mesh's faces (a face is a mesh its triangle) and retrieve the corresponding vertex indices.
for(GLuint i = 0; i < mesh->mNumFaces; i++)
{
aiFace face = mesh->mFaces[i];
// Retrieve all indices of the face and store them in the indices vector
for(GLuint j = 0; j < face.mNumIndices; j++)
indices.push_back(face.mIndices[j]);
}
// Return a mesh object created from the extracted mesh data
return Mesh(vertices, indices);
}
绘制
函数实现
1
2
3
4
5
6
7
8
9
10
11
12
13
14
15
16
17
18
19//Mesh类中
void Draw(GLenum style, int size)
{
//遍历三角面
for (int i=0; i<indices.size(); i+=3){
//style为绘制模式,GL_LINE_LOOP为线框,GL_TRIANGLES为三角面
glBegin(style);
//Normal为法线,用于光照运算
//vertex为顶点坐标
//size为放缩的倍数,初始为400,用于滚轮缩放
glNormal3f(vertices[indices[i]].nor[0]*size, vertices[indices[i]].nor[1]*size, vertices[indices[i]].nor[2]*size);
glVertex3f(vertices[indices[i]].pos[0]*size, vertices[indices[i]].pos[1]*size, vertices[indices[i]].pos[2]*size);
glNormal3f(vertices[indices[i+1]].nor[0]*size, vertices[indices[i+1]].nor[1]*size, vertices[indices[i+1]].nor[2]*size);
glVertex3f(vertices[indices[i+1]].pos[0]*size, vertices[indices[i+1]].pos[1]*size, vertices[indices[i+1]].pos[2]*size);
glNormal3f(vertices[indices[i+2]].nor[0]*size, vertices[indices[i+2]].nor[1]*size, vertices[indices[i+2]].nor[2]*size);
glVertex3f(vertices[indices[i+2]].pos[0]*size, vertices[indices[i+2]].pos[1]*size, vertices[indices[i+2]].pos[2]*size);
glEnd();
}
}1
2
3
4
5
6
7
8//Model类中
void Draw(GLenum style, int size)
{
//遍历mesh绘制
for(GLuint i = 0; i < this->meshes.size(); i++){
this->meshes[i].Draw(style, size);
}
}主循环中绘制
1
2
3
4
5
6
7
8
9
10
11
12
13
14
15
16
17
18
19
20
21
22
23
24
25
26
27
28
29
30
31
32
33
34
35
36
37
38
39
40
41
42
43
44
45
46
47
48void display(Model &test){
//清缓存
glClear(GL_COLOR_BUFFER_BIT | GL_DEPTH_BUFFER_BIT);
//保存上一个变换矩阵,本项目中不用
// glPushMatrix();
//加载单位矩阵
glLoadIdentity();
//透视矩阵
gluPerspective(60.0, 1, 400, -400);
//摄像矩阵
gluLookAt(0, 0, 800, 0, 0, 0, 0, 1, 0);
//鼠标拖拽时进行相应的移动
if (clicking){
tx -= moveX;
ty += moveY;
}
moveX = moveY = 0;
//平移
glTranslatef(tx, ty, 0.0f);
//旋转
glRotatef(angle_ud,1,0,0);
glRotatef(angle_rl,0,1,0);
//以上矩阵生效顺序是从下至上
//设置默认颜色
glColor3f(1.0, 1.0, 1.0);
//根据模式来进行绘制
switch(sstyle){
case 0: //wire
glLineWidth(1.0f);
test.Draw(GL_LINE_STRIP,ssize);
break;
case 1: //flat
test.Draw(GL_TRIANGLES,ssize);
break;
case 2: //flat lines
glColor3f(0.8, 0.8, 0.8);
test.Draw(GL_TRIANGLES,ssize);
glLineWidth(1.5f);
glColor3f(0.2, 0.2, 0.2);
test.Draw(GL_LINE_STRIP,ssize);
break;
}
// glPopMatrix();
}
交互:
注册事件:
1
2
3
4
5
6void setEvents(GLFWwindow * window){
glfwSetKeyCallback(window, key_callback); //键盘事件
glfwSetMouseButtonCallback(window, mouse_click_callback); //鼠标按键
glfwSetCursorPosCallback(window, mouse_move_callback); //鼠标移动
glfwSetScrollCallback(window, scroll_callback); //鼠标滚轮
}键盘——旋转、切换:
1
2
3
4
5
6
7
8
9
10
11
12
13
14
15
16
17
18
19
20
21
22
23
24
25
26//键盘事件回调函数
void key_callback(GLFWwindow* window, int key, int scancode, int action, int mode)
{
//退出
if (key == GLFW_KEY_ESCAPE && action == GLFW_PRESS) {
glfwSetWindowShouldClose(window, GL_TRUE);
}
//旋转
else if (key == GLFW_KEY_LEFT && action == GLFW_REPEAT){
angle_rl -= 1;
}
else if (key == GLFW_KEY_RIGHT && action == GLFW_REPEAT){
angle_rl += 1;
}
else if (key == GLFW_KEY_UP && action == GLFW_REPEAT){
angle_ud -= 1;
}
else if (key == GLFW_KEY_DOWN && action == GLFW_REPEAT){
angle_ud += 1;
}
//切换style
else if (key == GLFW_KEY_SPACE && action == GLFW_PRESS){
sstyle = (sstyle+1)%3;
}
}1
2
3
4
5
6
7
8
9
10
11//旋转相关变换
//旋转全局数据
GLfloat angle_rl = 0;
GLfloat angle_ud = 0;
...
//in display()
glRotatef(angle_ud,1,0,0);
glRotatef(angle_rl,0,1,0);1
2
3
4
5
6
7
8
9
10
11
12
13
14
15
16
17
18
19
20
21
22
23
24//切换style
//style全局数据
int sstyle = 0;
...
//in display()
switch(sstyle){
case 0: //wire
glLineWidth(1.0f);
test.Draw(GL_LINE_STRIP,ssize);
break;
case 1: //flat
test.Draw(GL_TRIANGLES,ssize);
break;
case 2: //flat lines
glColor3f(0.8, 0.8, 0.8);
test.Draw(GL_TRIANGLES,ssize);
glLineWidth(1.5f);
glColor3f(0.2, 0.2, 0.2);
test.Draw(GL_LINE_STRIP,ssize);
break;
}鼠标——拖拽、缩放:
拖拽
1
2
3
4
5
6
7
8
9
10
11
12//全局鼠标坐标数据
//平移向量
GLfloat tx = 0;
GLfloat ty = 0;
//移动速度
GLfloat moveX = 0;
GLfloat moveY = 0;
//鼠标位置
GLfloat mouseX = 0;
GLfloat mouseY = 0;
//是否正在拖拽
bool clicking = false;1
2
3
4
5
6
7
8
9
10
11
12
13
14
15
16
17
18
19//回调函数
//实时记录鼠标位置及移动趋势
void mouse_move_callback(GLFWwindow* window, double xpos, double ypos){
//记录鼠标移动趋势——通过当前坐标与上一坐标计算
moveX = mouseX - xpos;
moveY = mouseY - ypos;
//记录鼠标当前坐标
mouseX = xpos;
mouseY = ypos;
}
//通知全局鼠标是否按下(即拖拽中)
void mouse_click_callback(GLFWwindow* window, int button, int action, int mods){
if (button == GLFW_MOUSE_BUTTON_LEFT && action == GLFW_PRESS){
clicking = true;
}
if (button == GLFW_MOUSE_BUTTON_LEFT && action == GLFW_RELEASE){
clicking = false;
}
}1
2
3
4
5
6
7
8
9
10// in display()
//鼠标拖拽时进行相应的移动
if (clicking){
tx -= moveX;
ty += moveY;
}
// 将运动趋势归零防止惯性
moveX = moveY = 0;
//平移变换
glTranslatef(tx, ty, 0.0f);滚轮缩放
1
2
3
// 全局数据
// 缩放倍数
int ssize = WIDTH/2;1
2
3
4
5
6// 回调函数
void scroll_callback (GLFWwindow* window, double xoffset, double yoffset)
{
//yoffset 是滚轮转动的程度
ssize += 5*yoffset;
}1
2
3
4
5
6
7
8
9
10
11
12
13
14
15
16
17
18
19
20//in Mesh class
//先前得到的ssize交给draw方法进行顶点坐标的放缩并绘制
void Draw(GLenum style, int size)
{
//遍历三角面
for (int i=0; i<indices.size(); i+=3){
//style为绘制模式,GL_LINE_LOOP为线框,GL_TRIANGLES为三角面
glBegin(style);
//Normal为法线,用于光照运算
//vertex为顶点坐标
//size为放缩的背书,初始为400,用于滚轮缩放
glNormal3f(vertices[indices[i]].nor[0]*size, vertices[indices[i]].nor[1]*size, vertices[indices[i]].nor[2]*size);
glVertex3f(vertices[indices[i]].pos[0]*size, vertices[indices[i]].pos[1]*size, vertices[indices[i]].pos[2]*size);
glNormal3f(vertices[indices[i+1]].nor[0]*size, vertices[indices[i+1]].nor[1]*size, vertices[indices[i+1]].nor[2]*size);
glVertex3f(vertices[indices[i+1]].pos[0]*size, vertices[indices[i+1]].pos[1]*size, vertices[indices[i+1]].pos[2]*size);
glNormal3f(vertices[indices[i+2]].nor[0]*size, vertices[indices[i+2]].nor[1]*size, vertices[indices[i+2]].nor[2]*size);
glVertex3f(vertices[indices[i+2]].pos[0]*size, vertices[indices[i+2]].pos[1]*size, vertices[indices[i+2]].pos[2]*size);
glEnd();
}
}
光照:
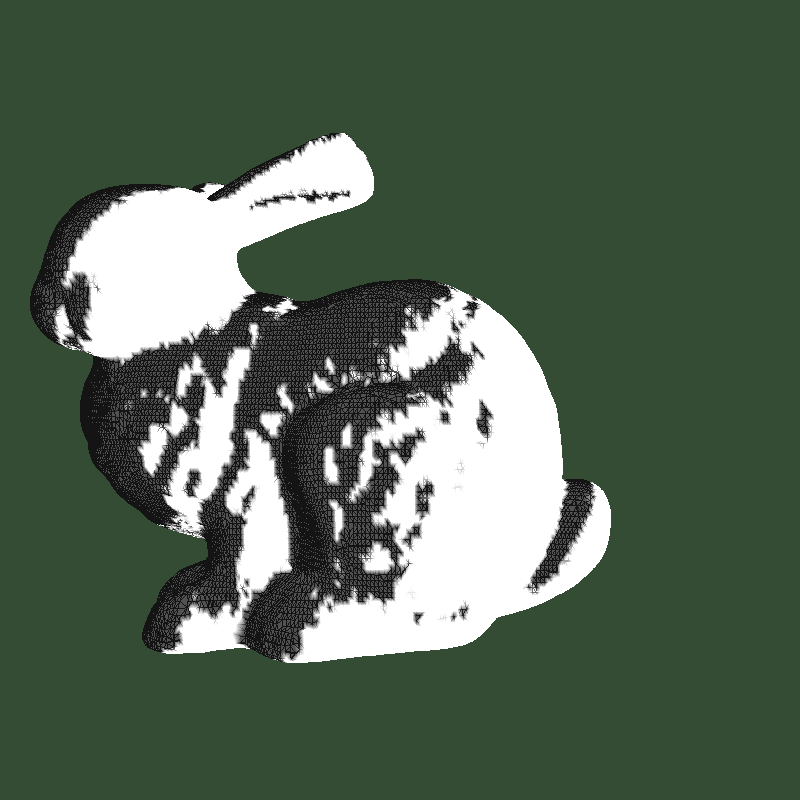
若如果没有光照,flat模式就会变成一片剪影(如图),因此特意为其添加光照效果
1 | //光照设置 |
得到有光照模型: